| Handmade
Engine Clips - Qualman Clips |
|
by David Qualman, owner Qualman
Rocketry
Once
I started scratch building rockets, a problem I encountered was the
expense, and availability, of engine clips. They are a basic
component, but are the one piece of metal that goes into a low power
model rocket. So, I couldn't just fabricate one from
cardstock or
plastic. This became an even greater concern to me once I
started
teaching model rocketry in the grade schools. I made the kits
for
the class to keep the costs low, and I found that the cost of the
engine clips were too high for the price point I wanted.
So I cogitated and
experimented to find a way to make my own low-cost engine clips.
I had several
goals in the design:
- Suitable
for 4th and 5th graders - so no exposed sharp edges once assembled.
- Low
cost
- Made
from easily accessible materials - OK, easily accesible at a local
hobby store, even if not from a craft store.
- Easily
made with tools I already had - no special shears, forming tools, or
sheet metal brake allowed. Needle-nose pliers and wire
cutters were OK.
- It
would automatically stay aligned with the body tube. It would not rock
side to side or twist, because it needs to hold the engine in place.
|
| Here's what I came up with: |
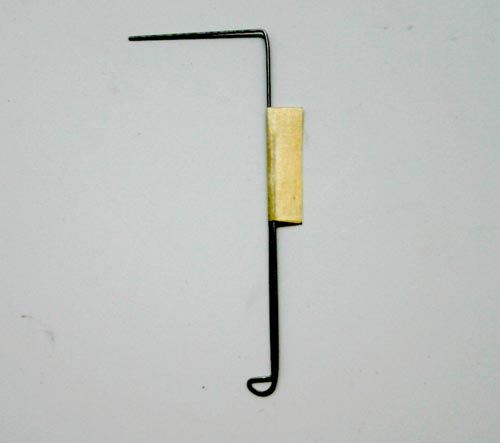 |
| Since I've never seen an
engine clip designed as I have, I've taken the liberty to call them
"Qualman clips" because, heck, we should all be able to have something
named after us. |
| The clips are made from
piano wire I get from my local hobby store. I use .025" for 13mm engine mounts,
and 0.039"
for
18mm
engine mounts, and differing larger sizes for higher power rockets. The
piano wire comes
in bundles of 3 pieces, each 3 feet long, for about $2.50 per bundle.
Since an engine clip requires about 7" of wire each, I can
get
about 15 clips, so each clip costs under 20 cents each. That
meets the low cost requirement. Since the piano wire can be
shaped with my needle-nose pilers, and cut with my wire cutters,
that meets the tools requirement. I should note that
some
wire
cutters are only strong enough to cut copper wire, and are actually
softer than piano wire. I started by using the cutter section
of
my drop forged Vise-Grips (i.e. locking pliers), and eventually bought
a wire cutter with hardened steel. | 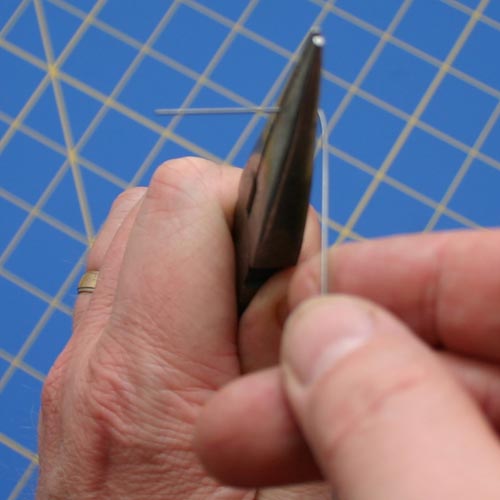 |
Note the upper wire.
It is about 1" long, give or take.
That compares to the upper arm of a standard engine clip,
such as is made by Estes or Quest, which might only be 1/8" long.
There's a reason for that. As many in the rocket
hobby have
heard, it is a common mistake to assume that the upper arm on a
standard engine clip is used to keep the engine from going up into the
rocket.
As
we know, that's what the engine block is for. Well, not with
this
clip. On a Qualman Clip, the upper arm actually is
used to
hold
the engine in place, and to keep it from going up into the rocket.
It crosses over the top if the engine, holding it in place,
so
that an engine block isn't even needed for most low power rockets.
That's
an even greater savings, since the engine block could be left out of
the kit.
|
| If
the rocket is heavy, or a larger engine is used, like a D engine, I'll
also mount an engine block as extra reinforcement. I've
never
had the upper arm bend and give way, but I have had the larger engines
dig into the wire a bit. |
| An
additional requirement was met by extending the upper arm all the way
across the body tube. It won't twist around like it would if
it
were inserted into one just side of the engine mount. (In order to give
full disclosure, that was actually the original reason for the long
upper arm. Later, it was found to be sufficient to act as an
engine block, as described below.) |
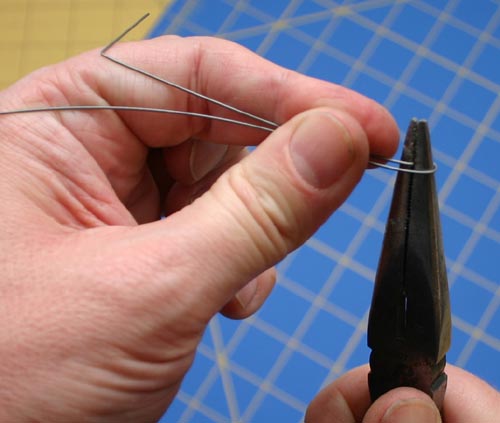
| The retention
hook is made by wrapping the clip around needle-nose pliers. |
 |
| Cutting the thin
piano wire can leave a sharp burr that would be unwelcome to little
kids' fingers.
For this reason, the remaining wire is left a bit long, so
that
it can be tucked back inside of the engine mount. For safety,
the end of the wire can be wrapped with tape, which can be left on
during assembly, as shown in the photo above. This way, after assembly, all of the pointy
edges are hidden inside the rocket, for safe launching. |
But, there's still a
problem,
because the narrow wire could tear upward
through the engine mount, breaking free, and giving a bad, bad
experience. But, that's solved with a piece that is already
included
in the rocket - the upper centering ring. The upper centering
ring is mounted so that it is flush with the upper arm of the Qualman
Clip.
When
ignited, the engine pushes up on the upper arm of the Qualman Clip,
which pushes on the upper centering ring, which is attached to the body
of the rocket, so the entire rocket goes up, and up, and up!
Also,
this is a good time to mount a piece of fire-resistant string to
the engine mount, below the centering ring, as a place to connect the
shock cord. For an extra secure grip, put it below the Qualman
Clip. | 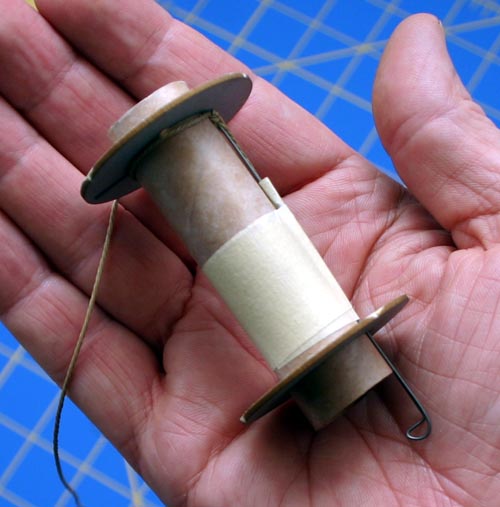 |
| The
lower centering ring is used to keep the engine mount from rocking side
to side. The small divet in the center hole, and the glue
fillet
around the centering ring, hold the clip securely. The masking tape
is wrapped around the mount to hold the clip during assembly. Once glued together, we've got a completed
engine mount using a Qualman Clip. |


